
Welcome to the final installment of our comprehensive procurement automation series! In the previous parts, we explored how to efficiently manage inventory levels in Shopify, integrate product and vendor details into QuickBooks, and automate the creation of purchase orders.
This concluding article focuses on streamlining the invoice processing workflow. We will guide you through setting up an automation that monitors your email inbox for incoming vendor invoices, uploads these documents to Google Drive and Airtable for organized storage, and then automatically forwards them to your finance team for timely payment processing. This ensures a seamless and error-free transition from invoice receipt to payment initiation.
Automatically Forwarding Invoices Received via Email: How the Process Works
In this tutorial, we will construct a Make.com scenario designed to automate the handling of vendor invoices. This scenario will vigilantly watch your email inbox for new invoices, securely store them across two key applications—Airtable for structured data and Google Drive for document storage—and finally, dispatch them to your finance department for payment processing.
The automation begins by actively monitoring your email for invoices from specified vendors. A crucial filter is applied to the incoming emails, searching for keywords like "invoice" in the subject line and ensuring that only emails containing attachments are processed. This prevents the system from acting on irrelevant communications. Upon detection, Make.com simultaneously creates a new record in Airtable and prepares the invoice attachment for upload.
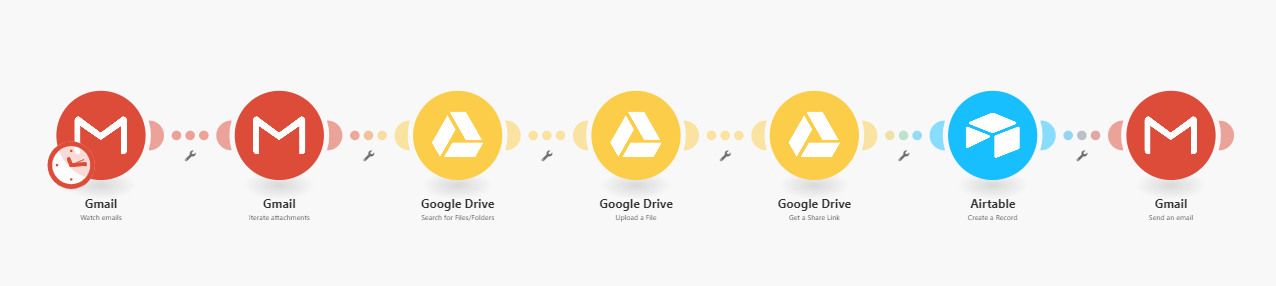
The invoice attachments are then uploaded to dedicated Google Drive folders, with each vendor having its own subfolder for organized storage. Concurrently, the invoice details are logged into a master Airtable base, specifically within the "Supplier Invoices" table, where their status is automatically set to "Awaiting Payment." Finally, an email containing the invoice is sent to your finance team, prompting them to initiate the payment. This end-to-end automation significantly reduces manual effort, operates continuously, and minimizes the costs associated with traditional invoice handling.
Before we dive into building this, it's important to note that all our procurement automation scenarios utilize the same Airtable base. You can access and copy this base to get started. Now, let's proceed with setting up this powerful automation.
Step 1: Retrieving Invoices and Uploading to Google Drive
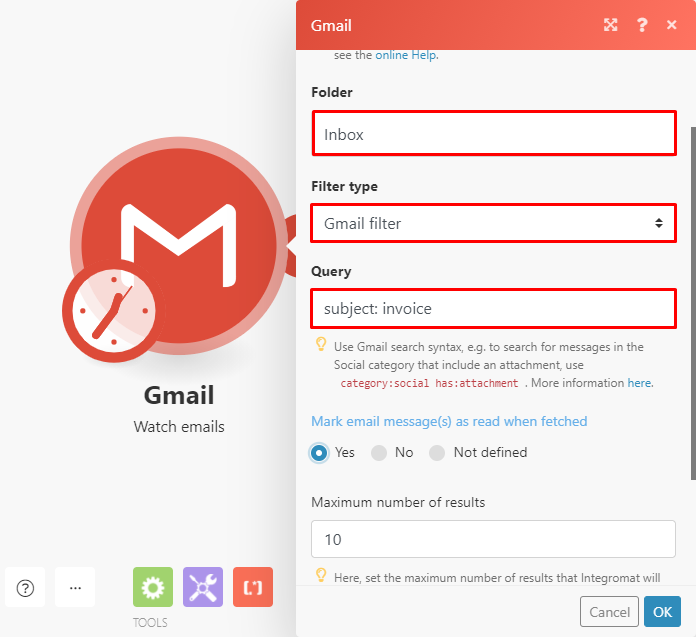
To begin, navigate to your Make.com dashboard and create a new scenario. The first module you'll need to add is the "Gmail > Watch emails" module. After successfully establishing a connection between your Gmail account and Make.com, configure this module with the following settings:
- Specify the inbox folder that Make.com should monitor for incoming invoices.
- Set the Filter type to Gmail filter.
- In the Query field, enter a search query that accurately identifies invoice emails. For instance, you might use "subject:invoice" to target emails with "invoice" in their subject line. Remember to adjust this query if your vendors use different terminology.
- You have the option to mark emails as read once they have been processed by the scenario.
- Consider increasing the Maximum number of returned emails during a single scenario execution, especially if you anticipate a high volume of incoming invoices.
It's crucial to ensure that only emails containing actual invoice attachments are processed, preventing "false positives" such as emails discussing invoices without an attached document. To achieve this, we'll utilize a specific module designed for attachment handling.
Add the "Gmail - Iterate attachments" module to your scenario. This module acts as an iterator, allowing Make.com to process each attachment individually. No further configuration is typically required for this module, as it automatically inherits data from the preceding Gmail module. Simply click "OK" to confirm and proceed to the next stage of your automation setup.
Pro tip: Regularly review your Gmail filter query to ensure it remains effective. Vendor email patterns can change, and updating your filter will maintain the accuracy of your invoice automation.
Step 2: Adding the Google Drive Modules
For efficient organization, it's best practice to maintain separate subfolders for each vendor within your Google Drive, such as "Invoices/VendorName." This structure allows for easy retrieval and management of documents.
To ensure invoices are uploaded to the correct vendor-specific folders, it's critical that the Google Drive subfolder names precisely match the sender names in the incoming emails. Any discrepancy will prevent the automation from functioning as intended.
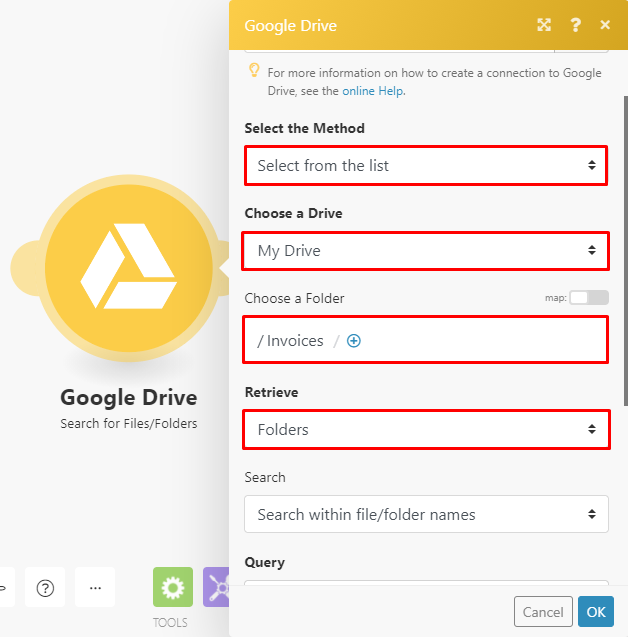
Start by adding the "Google Drive - Search for files/folders" module to your scenario. After connecting your Google Drive account to Make.com, configure it as follows:
- Under the method, select Select from the list.
- Choose My Drive as the location.
- Specify the main parent folder where your vendor subfolders are located.
- Under Retrieve, select Folders.
- Enable the option to search within file/folder names.
Next, map the Sender: Sender name element from your Gmail module to the Query field. This tells Google Drive to search for a folder whose name contains the sender's name. Ensure the search is configured to find names containing the search term. Finally, increase the Limit field to 10 or more to ensure all potential matching folders are considered, especially if you have similar vendor names.

Once these settings are applied, click "OK" and then add the "Google Drive - Upload a file" module to your scenario. In this module, simply map the File ID from the previous "Google Drive - Search for files/folders" module to the Folder ID field. The Source file should already be pre-selected from the "Gmail - Iterate attachments" module. Confirm these settings by clicking "OK" and proceed to the next step.
Step 3: Create a Record on Airtable and Send an Email to Finance for Payment
Before we can create a record in Airtable that includes the sender's name, email address, and a direct link to the invoice file, we first need to generate a shareable link for the uploaded Google Drive file. This link will serve as the reference point for the invoice within Airtable.
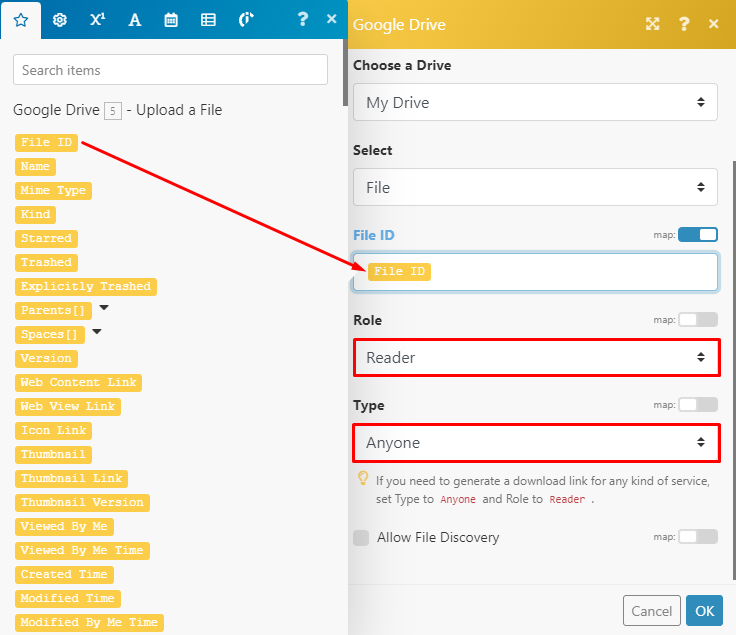
To obtain this link, add the "Google Drive > Get a share link" module to your scenario. In the configuration panel for this module, map the File ID output from the "Google Drive - Upload a file" module to the File ID field. Crucially, ensure that the Role is set to "Reader" and the Type is set to "Anyone." This configuration ensures that anyone with the link can view the invoice, which is necessary for your finance team to access it.
Once you have configured these settings, click "OK" to save the module. With the shareable link now generated, you are ready to proceed to the next step, which involves adding the invoice data to your Airtable base.
Step 4: Adding Invoice Data to Airtable
Now, it's time to integrate the invoice data into your Airtable base. Add the "Airtable > Create a record" module to your Make.com scenario. In the configuration box for this module, you will need to select the appropriate Base and then specifically choose the Supplier Invoices table. This is the designated location where Make.com will create new records for each newly received invoice.
Proceed to map the relevant data fields. Map the Sender: Sender name and Sender: Email address elements from your Gmail module to the corresponding Sender and Email fields in your Airtable table. For the Status field, input "Awaiting payment" to automatically categorize new invoices for your finance team.
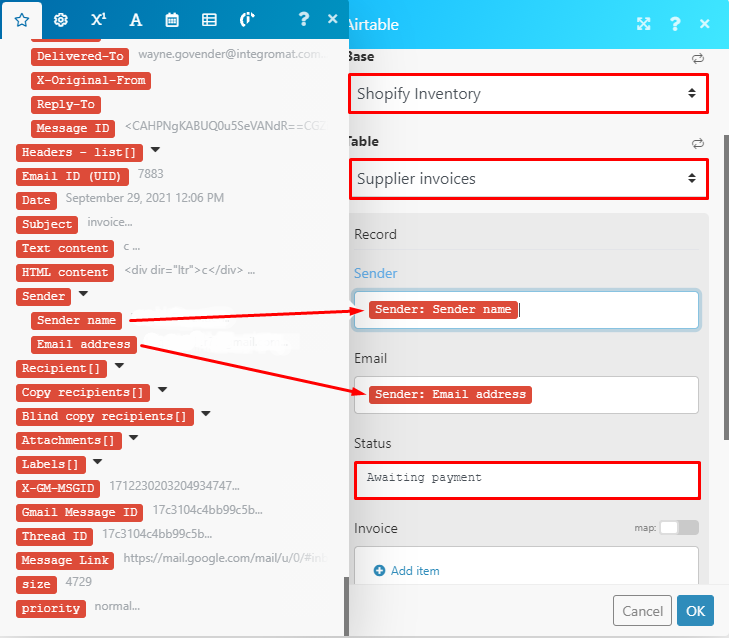
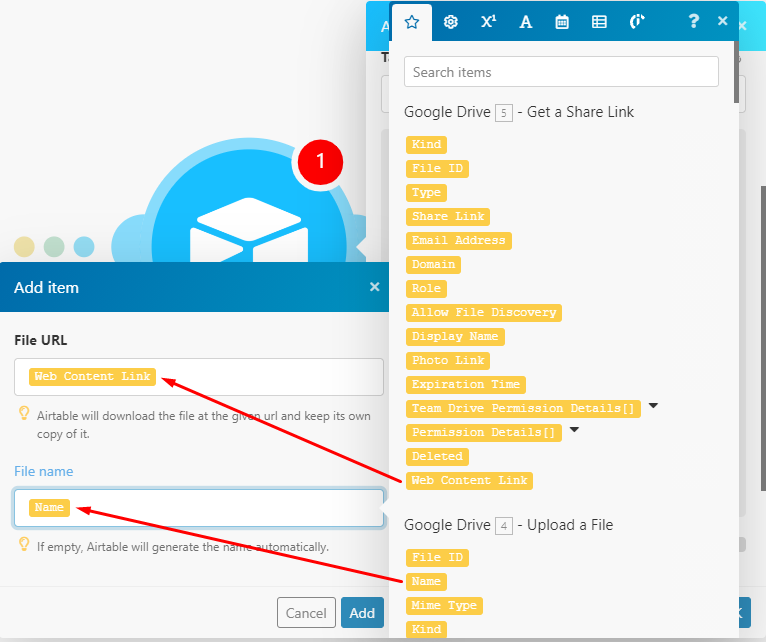
Within the Invoice field, click on Add item. Here, you will map the Web Content Link element, which was generated by the "Google Drive - Create a share link" module, to the File URL field. Additionally, map the Name element from the "Google Drive - Upload a file" module to the File name field. This ensures that the Airtable record not only contains the invoice details but also a direct link to the document in Google Drive.
Pro tip: Consider adding a "Date Received" field in Airtable and mapping the email's date to it. This provides a clear timestamp for when the invoice was first processed, aiding in audit trails and payment tracking.
Step 5: Auto Forwarding the Invoice to the Finance Team
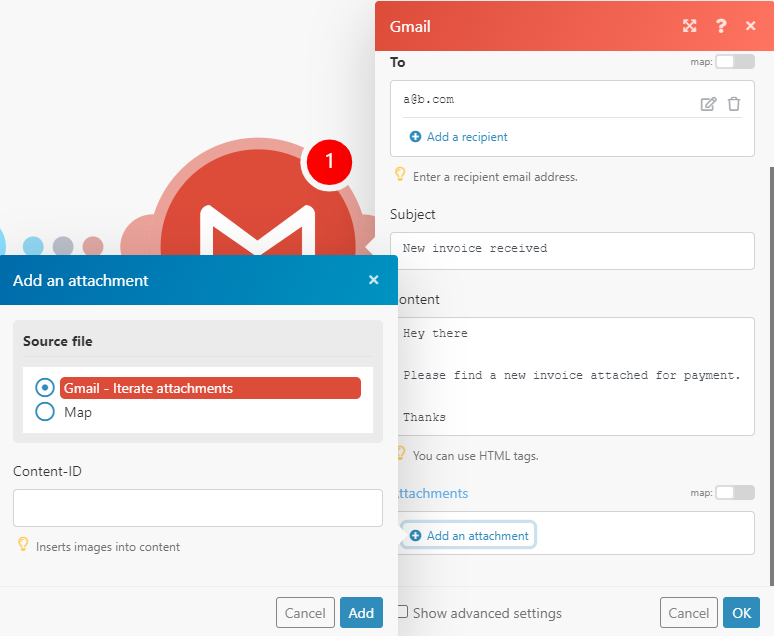
The final step in this automation is to ensure your finance team receives the invoice for payment processing. To achieve this, add the "Gmail > Send an email" module to your scenario. This module will automatically forward the original invoice email to the designated recipients.
In the configuration box, specify the email address(es) of your finance team members or the finance department's shared inbox. You have full flexibility to customize the subject line and body content of this forwarded email to include any specific instructions or information relevant to your finance team. This ensures they receive all necessary context for processing the payment.
Scroll down to the Attachments section and click Add an attachment. You'll notice that "Gmail > Iterate attachments" is automatically selected as the Source file. This means the original invoice attachment will be included in the forwarded email. Simply click Add to confirm this selection. Once all configurations are complete, click "OK" and proceed to the final step of testing your scenario.
Step 6: Testing the Scenario
To ensure your newly built automation functions correctly, it's essential to perform a test run. If you have an email in your inbox that meets the criteria defined in your initial "Gmail > Watch emails" module (e.g., an email with "invoice" in the subject line and an attachment), execute the scenario.
During the execution, you should observe the following actions taking place:
Verify that the invoice attachment is successfully uploaded to the correct vendor-specific folder in Google Drive, a new record is created in your Airtable "Supplier Invoices" table with the status "Awaiting payment," and the email containing the invoice is forwarded to your finance team. Once you've confirmed that all steps executed as expected, save your scenario and schedule it to run at your desired intervals (e.g., every hour, daily).
After the finance team processes the payment, the status of the corresponding record in the "Supplier Invoices" table can be manually updated to "Paid." While this series doesn't cover it, you could also develop a separate Make.com scenario to automatically update payment statuses by monitoring your accounting software or bank transactions.
Bonus: Slack Notifications
For businesses utilizing instant messaging platforms like Slack for inter-departmental communication, integrating Slack notifications into your invoice automation can significantly enhance efficiency. This allows your finance team to receive immediate alerts about new invoices directly within their preferred communication channel.
To add this functionality, include the "Slack > Upload a file" module to your existing scenario. After connecting your Slack account to Make.com, configure the module by clicking Add item under Channels. Select the appropriate Channel Type (e.g., public channel, private channel, direct message) and then tick the specific channel(s) where you want the invoice notification to be sent. You can also add a custom title and comment to the message, providing quick context for your finance team.
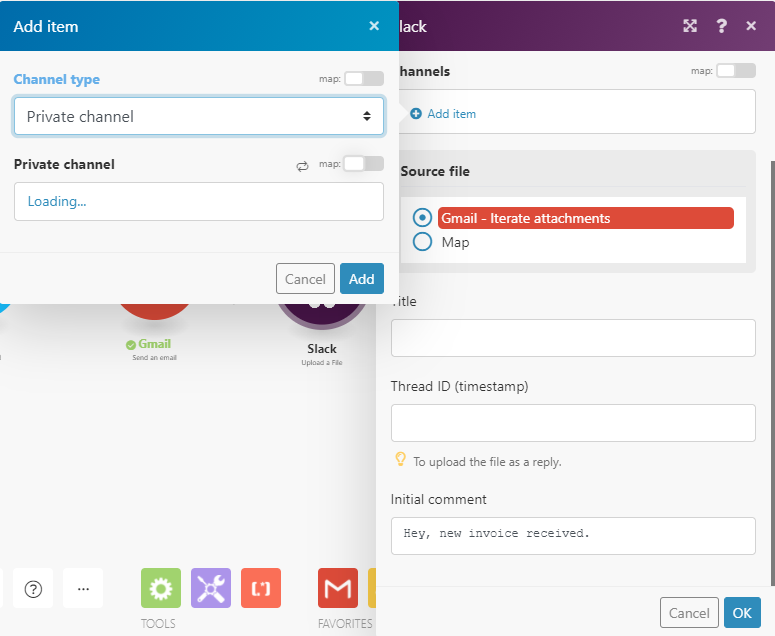
Once you've completed these configurations, click "OK," save your scenario, and activate it. This will ensure that every time a new invoice is processed, your finance team receives a timely notification and a direct link to the invoice file in their designated Slack channel, further streamlining communication and accelerating payment cycles.